M.S, OBGY, CAS SPECIALIST AREA HOSPITAL AMALAPURAM
CONSULTANT GYNAECOLOGIST TRINITY HOSPITALS AMLAPURAM, ANDHRAPRADESH.
DEFINITION: Uterine fibroids, also known as uterine leiomyomas or fibroids, are benign smooth muscle tumors of the uterus.
SIGNS AND SYMPTOMS:
Symptomatic in only 35-50% of Patients and depend on location, size, secondary changes & pregnancy status
1-Abnormal uterine bleeding.
2-Dysmenorrhoea.
3-Pressure Effect: occur If large in size that may distort or obstruct other organs like ureters, bladder or rectum urinary symptoms, hydroureter, constipation, pelvic venous congestion & lower linb edema. Rarely a posterior fundal tumor extreme retroflexion of the uterus distorting the bladder base and urinary retention Parasitic tumor may cause bowel obstruction.
5-Cervical tumors with serosanguineous vaginal discharge, bleeding, dyspareunia or infertility.
6-Infertility: The relationship is uncertain however, 27-40% of women with multiple fibroids are infertile, Endometrial cavitary tumors affect fertility more.
7- Spontaneous Abortion: More with intracavitary tumorsIts incidence before myomectomy is 40% and after myomectomy is 20%.
IMAGING:
- Pelvic U/S with dopplar study is very helpful in confirming
- Saline hysterosonography can identify submucous myoma that may be missed on U/S
- HSG will show intrauterine leiomyoma
- MRI highly accurate in delineating the size, location & no. of myomas
- IVP will show ureteral dilatation or deviation & urinary anomalies
- Hysteroscopy for identification & removal of submucous myomas
Laparoscopic management of fibroid uterus:
- Selection of patient:should be fit for surgery and general anesthesia.
- Only to be done for myomas not exeeding 10cms in size
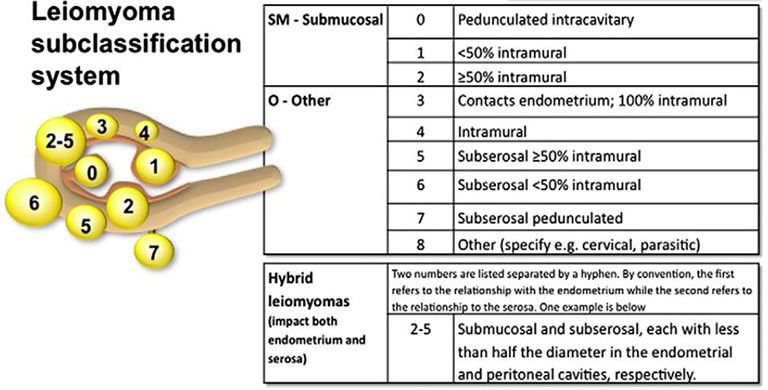
- The number, length, depth, width,location, their type, distance between the myoma and endometrial cavity should be measured on u/s
- Dopplar examination gives us the vascularity of the myoma
- Operative hysteroscopy should ideally avoided with this procedure as it can provoke distension of uterus that can lead to excessive bleeding during myomectomy
Consent for myomectomy
Consent for conversion of procedure into open surgery in case of any complication
Consent for chances of hysterectomy in case of severe complications
Bowel preparation: Allowed soft diet till afternoon and followed by liquid diet on previous day of surgery up to 8pm. Nill by mouth at least for 8hrs before surgery. PEGLEC powder can be given for bowel preparation on before night of surgery.preop medication and antibiotic dose to be given 1hr before surgery.
Laparoscopic myomectomy
- Anesthesia is general
- Naso-gastric tube administration
- Position of patient: low modified lithotomy, patient lies with Tighes spread, with abduction, and buttocks protruding generously over the edge of the table, that to be combined with 30degree trendlenburgh position after placing the primary port
- Patient return plate should be attached to pt buttocks
Monitor CCD-camera, light source, insufflator with CO2 cylinder, electrosurgical generator, suction irrigation system -all in one cart
10mm port, 5mm ports x3, veress needle,10mm 30 degree telescope, Maryland, atromatic-grasper, semi-tromatic grasper, monopolar hook, bipolar grasper, harmonic scalpel, cold scissors, 5mm myoma screw, 2 needle holder, 10mm tenaculum, motorized morcellator, suture material no1 vicrly, knot pushers and suction cannula and tubings, vasopressin 5ml in 100ml NS
Position of surgical team:
Surgeon and scrub nurse on left side of pt, monitor target organ and surgeons visual axis in coaxial line, assistant surgeon on right side .we can have another srubbed assistant between the pt legs if we want any uterine manipulation. Preparation of parts done by scrubbing and draping under aseptic techniques.
Preparation of equipment:
Insufflator is turned on to remove air from tubings and set pressure is set at 20mmhg, set flow rate set at 1 l/min, camera is turned on focusing to be done at 10cms, white balance to be adjusted. Set up the connections of req instrument bipolar/harmonic with electrosurgical generator.
Operative Steps proper:
- Take veress needle and check for its spring action and patency
- Connect the veress needle with CO2 tubing and flush out the dead space
- Connect Veress needle to CO2 tubing and flush out dead space
- Take 2 Allis forceps to evert and hold each side of umbilicus
- Use number 11 blade to place small horizontal stab wound to inferior crease of umbilicus
- Mosquito clamp to dissect away subcutaneous adipose and expose rectus sheath
- Measure abdominal wall thickness and add 4cm for distance to hold Veress needle
- Hold Veress needle at calculated length like a dart
- Assistant and surgeon to hold the lower abdomen up
- Surgeon to place Veress needle in sub-umbilical incision at 45 degrees down into pelvis towards anus and also perpendicular to abdominal wall
- Insert Veress needle until two clicks felt and Maintain 45 degree angle
- Confirm correct Veress needle placement –irrigation test, aspiration test, plunger test, and hanging drop test
- Connect CO2 gas tube to Veress needle and Turn on CO2 and allow flow rate of 1L/min
- Observe quadro-manometric indicators to rise in parallel for volume of gas and actual pressure and Observe for general distension of abdomen and percuss for obliteration of liver dullness
- Once pneumoperitoneum is achieved with set pressure of 20 mmHg,extend skin incision horizontally
- Hold 10mm port like a gun and insert it perpendicular to abdomen & tilt to 60 degrees towards pelvis when there is loss of resistance
- Confirm intra-abdominal placement of primary port with escaping air sound and audible click and Take out trocar
- Set the pressure rate at 12 mmhg and flow rate at 6 lts/min
- Connect gas tubing to primary port
- Insert telescope and inspect entry point
- Request for Trendelenburg of 30 degrees position
- Camera cable should be at 6 o’clock and light source should be at 12 o’clock
- Apply baseball diamond shape principle for lateral port insertion
- If uterus is less than 12 wks size primary port is kept at lower umbilical crease, if uterus is 14 to 18 wks size then primary port will be supraumbellical ,if uterus is 20 wks size primary port should be placed at palmars point
- Transilluminate at target organ, the uterus with fibroids
- Make a diamond shape with thumbs at umbilicus and index fingers towards target organ
- Incise skin along Langer lines for secondary ports x 2
- Insert lateral ports (5mm x 2 at LIF and RIF) at position of snuff box which is about 8cm from umbilicussh ould be placed high and outside the epigastric vessels so that good access is provided incase of ipsilateral ports -5mm port in left iliac fossa 3cms above the anterior superior iliac spine, another 5 mm port above and medial to previous port in LIF 5 cms away
- All ports should be inserted perpendicular to the abdomen.
- Once all lateral ports inserted, then reduce set pressure to 12mmH
- Atraumatic graspers to perform systematic inspection of entire abdomen and pelvis in clockwise fashion
- Preventive Haemostasis
- Fixation of Myoma
- Enucleation Myoma
- Obliteration of Dead space
- Retrieval of Myoma
Preventive haemostasis:
- vasopressin 5ml of 1 in 100 dil injected at the junction of the fibroid with the uterus.
- Now look for blebbing and pallor on fibroid due to vasopressin injected.this acts for 20-30 mins
- Carefully plan for incision if ipsilateral ports are used then horizontal/oblique incision is recommended in case of contralateral port position vertical or oblique incision is recommended.
- In case of multipule fibroids incision is planned in such a way that maximum myomas can be removed from one incision.
- Now incise the most bulging part on the fibroid with harmonic scalpel or monopolar hook until the capsule of the myoma is visualized
Fixation of myoma and enucleation:
- With 2 graspers, cut edges are pulled so that the capsule is exposed and myoma screw is inserted
- Now with myoma screw give gradual traction preferably anteromedial traction and counter traction with blunt instrument like suction cannula and blunt dissection is done
- Position of myoma screw is changed from time to time to apply traction on cleavage line until enuleation is done
- The large feeding vessels at the base of the fibroid are cauterized with bipolar and cut with scissors or harmonic scalpel
- Care is taken not to open the cavity
- Undue use of cautery is avoided as it leads to defective healing and weak scar formation
- Myoma after removal is placed in the culde sac or paracolic gutter
- Reconstruction of myoma bed is done with no 1 vicryl suture
- The main aim of suturing is to obliterate the dead space to avoid haematoma formation
- Extracorporeal knotting technique is preffered
- Start from one angle first suture should be placed beyond the angle
- The rest of the defect is closed
- Last suture should be beyond the other angle
- The serosal layer is closed with Dundee jamming continuous suturing with Aberdeen termination
- One of the ports is converted to 12mm and morcellator inserted
- The myoma is held with tenaculum and is fed to motorized morcellator.
- Take care not to move morcellator near the tissue instead tissue to be fed to morcellator with tenaculum
- A meticulous lavage is given, haemostasis is checked and proceeded for port closure
- Port closure is done under vision with outer sheath of veress needle after slightly deflating the abdomen so that sutures are not in tension
- The last port to be closed is the telescope port, done after completely deflating the abdomen, and keeping the telescope in and removing the cannula followed by telescope at last.
- The skin incision is closed with staplers and dressing done.
.
| Older Post | Home | Newer Post |
How to Perform and Implement Task Analysis of Laparoscopic and Robotic Procedures
Task analysis is a critical component of any complex surgical procedure, including laparoscopic and robotic surgeries. It involves breaking down the procedure into its constituent tasks, identifying the steps, skills, and cognitive processes required. Task analysis not only enhances the understanding of these intricate surgeries but also serves as a foundation for training, skill assessment, and continuous improvement in healthcare. In this essay, we will delve into how to conduct and implement task analysis for laparoscopic and robotic procedures.

Understanding the Significance of Task Analysis
Before we explore the procedure for task analysis, it's essential to recognize why it is of paramount importance in the realm of surgery, particularly for laparoscopic and robotic procedures.
1. Enhanced Learning and Training: Task analysis helps in developing structured training programs. It breaks down complex procedures into manageable components, making it easier for trainees to learn and practice each step methodically.
2. Skill Assessment: By understanding the tasks and sub-tasks involved, it becomes possible to assess the competence of surgeons and surgical teams. This is crucial for ensuring patient safety and quality care.
3. Workflow Optimization: Task analysis can reveal inefficiencies in surgical workflows. Identifying these bottlenecks allows for process improvements, potentially reducing surgical times and enhancing outcomes.
4. Error Reduction: Recognizing potential points of error is vital for preventing surgical complications. Task analysis can highlight critical steps where errors are more likely to occur, leading to proactive measures to mitigate risks.
Procedure for Task Analysis of Laparoscopic and Robotic Procedures:
Task analysis for laparoscopic and robotic procedures involves several steps:
Step 1: Define the Surgical Procedure
Begin by clearly defining the surgical procedure you wish to analyze. Whether it's a laparoscopic cholecystectomy or a robotic prostatectomy, having a specific procedure in mind is essential.
Step 2: Gather Expert Input
Engage experts in the field, including experienced surgeons, nurses, and other surgical team members. Their input is invaluable in identifying and detailing the tasks involved.
Step 3: Identify the Tasks and Sub-Tasks
Break down the surgical procedure into tasks and sub-tasks. For instance, in a laparoscopic cholecystectomy, tasks could include trocar placement, camera insertion, gallbladder dissection, and suturing. Sub-tasks under "trocar placement" might involve choosing trocar sizes, making incisions, and inserting trocars.
Step 4: Sequence the Tasks
Establish the chronological order of tasks. Determine which tasks are dependent on others and identify any parallel processes. Sequencing tasks is essential for understanding the flow of the procedure.
Step 5: Define Task Goals and Objectives
For each task and sub-task, define the goals and objectives. What should be achieved in each step? For instance, in gallbladder dissection, the goal might be to safely detach the gallbladder from the liver while preserving nearby structures.
Step 6: Skill and Equipment Requirements
Specify the skills and equipment required for each task. Consider the level of expertise needed, such as basic laparoscopic skills or advanced robotic manipulation. Document the instruments and technology involved.
Step 7: Cognitive Processes
Identify the cognitive processes involved, such as decision-making, spatial orientation, and problem-solving. Understanding the mental aspects of surgery is critical for training and error prevention.
Step 8: Consider Variations and Complications
Acknowledge potential variations in the procedure and anticipate complications. How would the surgical team adapt if unexpected issues arise? Task analysis should encompass both the standard procedure and potential deviations.
Step 9: Develop Training and Assessment Tools
Use the task analysis results to create structured training modules. These modules should align with the identified tasks, objectives, and skill requirements. Additionally, design assessment tools to evaluate the competence of trainees and surgical teams.
Step 10: Continuous Improvement
Task analysis is not a one-time endeavor. Regularly revisit the analysis to incorporate new techniques, technology, and best practices. Continuous improvement is vital for staying at the forefront of surgical care.
Implementing Task Analysis Results:
Once task analysis is complete, it's crucial to implement the findings effectively:
1. Training Programs: Develop and deliver training programs based on the task analysis. These programs should encompass both simulation-based training and real-life surgical experience.
2. Skill Assessment: Use the assessment tools developed during task analysis to evaluate the skills of surgical teams. This can be done through structured evaluations and objective metrics.
3. Quality Improvement: Task analysis can reveal areas for process improvement. Work with the surgical team to implement changes that enhance efficiency and patient outcomes.
4. Error Prevention: Utilize the identified points of error to develop strategies for error prevention. This might involve checklists, preoperative briefings, and enhanced communication protocols.
5. Research and Innovation: Task analysis can also guide research efforts, leading to the development of new techniques and technologies that improve surgical procedures.
In conclusion, task analysis is an indispensable tool in understanding, teaching, and advancing complex surgical procedures such as laparoscopic and robotic surgeries. By meticulously dissecting each task and sub-task, identifying skill requirements, and considering cognitive processes, healthcare professionals can enhance patient safety, optimize surgical workflows, and continually improve the quality of surgical care. Task analysis is not merely an analytical exercise; it is a pathway to excellence in surgical practice.