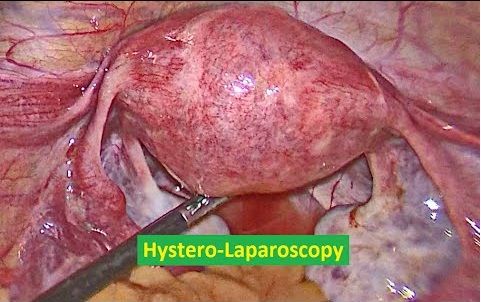
Task Analysis Diagnostic Hystero-laparoscopy (Pelviscopy) With Chromotubation
Dr. C . MAMATHAMBBS, MS OG, FMAS, DMAS, FRM
Hosur, Tamilnadu
JULY 2019 Batch – WLH Gurgaon, India
Preoperative workup :
- Prepare parts – Abdomen, back, thigh, perineum
- Secure IV line
- Appropriate Investigations
- Pre-anesthetic evaluation
- Written and Informed consent
- Overnight fasting status
- Tablet Misoprostol 400 mcg vaginally for cervical dilatation 2 hrs - 4 hrs prior to the procedure in case of nulliparous women
- Antibiotic coverage one hour prior to the procedure
TIMING OF PROCEDURE -
Diagnostic hysterolaparoscopy with chromotubation must be performed between day 6 - 12 of the regular menstrual cycle (Preovulatory phase)
MULTIDISCIPLINARY TEAM -
- Primary Surgeon,
- Assistant surgeon,
- Anesthetist,
- Scrub nurse,
- OT technician,
REQUIRED INSTRUMENTS –
Laparoscopic Instruments:
- Monitor
- Light Source and Camera Control Unit- 30 degrees 5mm for Diagnostic, if any procedure to be performed then 10mm laparoscope
- Insufflator and CO2 Gas Cylinder
- Electro Surgical Unit
- Pre-set Pressure (Ideal 12 to 15mmHg)
- Video Recorder & Printer
- Suction Irrigation system
- Active Electrode Monitoring System
- -Instruments – sterilised reusable/ disposable
- Veress needle – 12 cm length
- 10 mm port (x 1) (if required)
- 5 mm port (x 2) – if the additional procedure is to be performed then Two Secondary ports are necessary
- Surgical Blade No 11 (x1)
- 10 ml Syringe and Normal Saline (x1)
- 10ml syringe with 2% Xylocaine
- Laparoscopy Aspiration Needle (x1)
- Atraumatic grasping forceps (x1)
- Tissue Dissection forceps (x1)
- Suction Irrigation tubing (x1)
- Set of Allis forceps
- Set of Artery forceps
- BP Handle (x1)
- 10 ml syringe with Methylene blue dye
- Rubin’s cannula(x1)
For Skin Closure:
- Suture Material : 3-0 Monocryl (x1) / No 1 Vicryl (x1)
- Needle Holder (x1)
- Tooth and Fine Forceps (x1)
- Suture Cutting Scissors (x1)
- Port Site Wound Dressing
Hysteroscopic Instruments:
- Sims Speculum (x1)
- Vulsellum (x1)
- Set of Hegar’s Cervical Dilators
- Uterine Curette (x1)
- Alleys forceps (x1)
- Uterine sound (x1)
- 30 degree 4 mm Telescope (x1)
- 4 channel diagnostic sheath (x1)
- IV line,
- Normal saline
PROCEDURAL STEPS:
Diagnostic laparoscopy with chromotubation
Diagnostic hysteroscopy
DIAGNOSTIC LAPAROSCOPY
Patient position:
- Modified lithotomy with 15-degree head-end low
- General anesthesia
- Local anesthesia at port sites with 2 % xylocaine
Position of personnel:
- Height of table = 0.49 x height of surgeon in cm
- co-axial alignment - Surgeon, Target Organ, Monitor
- The monitor is placed at a distance of 5 times its diagonal length from the Surgeon
- Monitor height = 15 degrees below surgeons eyesight level
- Focus camera at a distance of 10cm
- white balance through Telescope
- Primary Surgeon – Left side of the patient
- Assistant Surgeon- Between the legs of the patient for Uterine manipulation
- Scrub Nurse – by the side of the Primary Surgeon
- The anesthetic team at the head end of the patient
- Parts cleaned with an antiseptic solution and draped.
Port Position:
Optical port - inferior umbilical crease.
Diagnostic: one 5mm lateral port in left iliac fossa
Operative: 2 lateral ports by baseball diamond concept
Diagnostic Laparoscopy:
1. Site – Inferior Crease of Umbilicus
- Hold umbilicus with Allis forceps on either side to evert the inferior crease of umbilicus
- Infiltrate the site of the incision with 2% Xylocaine local anesthetic agent
- Make a stab incision of 2mm with No 11 surgical blade
- Check Veress Needle for spring action and patency
- Lift up the abdominal wall area below the umbilicus and assess its full thickness
- Veress Needle is held like a dart at a level of 4 plus thickness of the abdominal wall in centimeters by its shaft.
- Insertion of veress needle through the incision site in a manner that the veress needle makes an angle of 90’ with the abdominal wall and an angle of 45’ with the body of the patient
- Veress Needle insertion is aimed at the anus
- Insertion is achieved with two audible clicks; 1stof the Rectus Sheath and 2nd of the Peritoneum
- Release the Allis forceps and Abdominal wall
- Hold the Veress Needle at an angle of 45’ making sure that no further length of the needle is advanced
- Placement of Veress Needle inside the peritoneal cavity is confirmed by attachment of a 10ml Syringe filled with
- Normal Saline and performing the following tests:
- Irrigation Test: Injecting 5ml of Normalsaline, free flow confirms placement inside the peritoneal cavity
- Aspiration Test: There should not be any returning fluid, confirms placement inside the peritoneal cavity
- Hanging Drop Test: Drop of Normal Saline is placed at the hub of the Veress Needle and the abdominal wall is lifted. The suction of this drop into the abdominal cavity confirms placement inside the peritoneal cavity
- Plunger Test: Removing the plunger of the attached syringe; free flow of remaining Normal Saline into the abdominal cavity confirms placement inside the peritoneal cavity.
- Ensure that the Gas tubing is attached to the Insufflator and the Insufflator is switched ON. This will remove air from the Gas tubing and fill the gas tubing till its tip with CO2 gas.
- Confirm Pre-Set Pressure to 15mmHg on the Insufflator
- Attach the gas tubing to the veress needle and start the flow of CO2 gas at 1 liter per minute
- Find the minimum of the five reading on Insufflator; this will give us the Actual Pressure.
- Confirm obliteration of liver dullness and generalized distension of abdominal wall
- Keep watch on patient’s vital parameters and EtCO2 readings during insufflation
- Keep watch on the Insufflator reading of Actual Pressure, Flow of gas and Total amount of Gas used.
- The total amount of gas and actual pressure should rise parallel to each other
- When actual pressure has reached pre-set pressure and amount of gas used is 1.5 to 6 liters for an averagely build young patient
- Remove the veress needle from the abdomen and start preparation for Primary port-site insertion
- Primary Port Insertion
- Increase the size of the umbilical incision to 10 mm and dissect the subcutaneous tissue up to the rectus sheath with an artery forceps
- Hold the 10mm port (Trocar with the cannula) like a gun with index finger along the shaft, middle & ring finger wrapped around the gas vent and the port resting on to the thinner eminence of the palm and tip pointing towards the incision site
- Port is introduced through the incision in a rotating fashion pointing perpendicularly
- Once into the peritoneal cavity evident by an audible click and give-way sensation; direct the port at an angle towards the pelvis
- On removal of the trocar from the cannula, a whooshing sound of escaping gas is audible, which further confirms entry into the abdominal cavity
- The gas tubing should now be connected to the primary port.
- Insert the telescope into the primary port and visualize the intra-abdominal entry. (White Balance & Focal length adjustment done earlier)
- Immediately inspect the abdomen below the primary port site for any signs of injury
- Assisting surgeon:
- Insert simple urinary catheter and an empty bladder
- Hold the cervix with Vulsellum
- measure the uterocervical length with a uterine sound
- Dilate the cervix up to 5mm Hegar’s dilator
- Insertion of Rubin’s cannula
- Assembly of Vulsellum attached to Rubin’s cannula can be used for uterine manipulation and for chromotubation
- Chromotubation
- observed by the primary surgeon by laparoscopy
- Second port – 5mm - left iliac fossa – Baseball diamond concept
- Laparoscopy instrument should behave like Type -1 lever with half instrument inside and half instrument outside the abdomen.
- The primary port at the center and secondary port 7.5cm on either side of it.
- This makes the angle of elevation of 30’ and the manipulation angle of 60’ and azimuth angle of 30’.
- Projection of target on to the anterior abdominal wall and secondary port placement 7.5cm on the left and right of the primary port.
- Transillumination of the port site by the telescope avoiding the inferior epigastric vessels
- Infiltration of the incision site with local anesthetic 5mm skin incision
- insertion of 5mm port similar to as described above for primary port; however under vision Once the port tip has tented the peritoneum and visualized in the peritoneal cavity then it is directed to the pelvis
- The Preset pressure is now adjusted to 12 mmHg
- - If necessary a second can be introduced on the right side 7.5 cm from the Primary port or alternatively 5cm from the initial Left iliac fossa port.
- In case if the patient has consented and any surgical procedure deemed necessary to be performed along with diagnostic laparoscopy.
- Systematic Survey of Abdomen & Pelvis:
- Performed by Primary Surgeon with Telescope in right hand and Atraumatic grasper in the left hand; while the assistant sitting between the legs of the patient help with anteversion, retroversion and side retraction of the of the uterus
Abdomen:
Steep Trendelenburg’s position
Clockwise inspection starting from
- Right Iliac fossa
- Caecum
- Appendix
- Right Hypochondrium
- Ascending colon
- Hepatic flexure of Colon
- Remove steep Trendelenburg position
- The right lobe of Liver
- Gall bladder
- Stomach
- Falciform ligament
- Left lobe of the liver
- Left hypochondrium
- Spleen
- left iliac fossa
- Sigmoid colon
Pelvis:
Steep Trendelenburg’s position
- Anterior pouch
- Bladder
- The utero-vesical fold of peritoneum
- Median ligament
- Medial Ligaments
- Coopers ligament
- Posterior pouch
- Uterosacral ligament
- Rectum
- Uterus – Fundus, Anterior & Posterior surface
- Right & Left adnexal structures – Ovaries, Tubes, Round & Infundibulopelvic ligaments, Ovarian fossa & ligament
- Sacral Promontory
- Right & Left pelvis side wall – Deep ring, Ureters, Triangle of Doom, Trapezoid of Disaster
- Insitu findings are noted.
- Photos and video recording captured.
- Any pathological finding can be managed laparoscopically
- Suspicious areas can be biopsied
TUBAL PATENCY TEST - CHROMOTUBATION
- Assistant - fix the rubins cannula to cervix
- inject the diluted methylene blue dye into the uterine cavity
- The primary surgeon looks for the free flow of dye through bilateral fimbrial ends with help of atraumatic grasper supporting the tube from behind and lifting the tube anteriorly to visualize the fimbrial end
- If there is a leak of dye from the cervix , can reduce by grasping the cervix with alleys to avoid false-negative tubal patency test. Some times can block the contralateral tube by atraumatic grasper so that dye enters the ipsilateral tube to check patency.
- Suck all the methylene blue dye from cul de sac after completion of patency test.
- Laparoscopy must be done first so that cervical dilatation can be done under the vision to avoid uterine perforation.
- Check 4mm 30 degree rigid telescope
- Clean the eyepiece of the telescope with gauge
- Attach the telescope to 7 mm, 4 channel operative sheath after removing the obturator (lines on the telescope , the diagnostic sheath must be parallel - turn and lock it).
- The surgeon sits in between the legs
- Insert the vaginal SIMS speculum into the vagina
- Hold the cervix with vulsellum
- Dilate the cervix up to 10size hegar dilator
- Attach warm normal saline to the inflow of 4 channel operative sheath.
- Do the white balancing and focusing at 4 cm distance
- CCD cable must be at 6 o clock position
- The light source should be at 12 o clock
- To see the posterior wall of the uterus - rotate only the light source to 6 o clock
- To see the anterior wall of the uterus - keep the light source to the left to see right of the uterine cavity and vice versa.
- An arrow mark on the monitor also shows us the position of the light cable.
- Insert slowly and smoothly the hysteroscope with inflow on and light source on into the uterine cavity through the cervical canal.
- Insert the hysteroscope till fundus is seen then await till normal saline distends the uterine cavity and becomes clear.
- Endometrial flakes and blood clots might be noted.
- Systemically visualize the endometrium on the fundus, anterior wall, posterior wall, both lateral walls of the uterine cavity and both tubal ostia for normalcy or any lesions. Inspect the shape and size of the uterine cavity.
- Air bubbles will be seen near tubal ostia if tubes are patent
- Keep watch on the patient’s vital parameters and Capnography reading.
- Stop insufflation and make note of Total amount of gas used during the surgery and total time of surgery.
- Ensure Haemostasis
- Confirm Instrument count
- Avoid sudden decompression of pneumoperitoneum and abrupt removal of ports
- Removal of Secondary Port under the vision
- Precaution while removing Primary port - Do not abruptly remove the port.
- Keep the telescope in the abdominal cavity and start withdrawing the cannula
- Once the cannula has reached within the abdominal wall then start withdrawing the telescope
- This process will avoid entrapment of Omentum or Bowel within the Primary port wound
- Primary Port fascia and Skin closed; Secondary Port Skin closed
- Fascia closed with Vicryl and Skin with fine Monofilament suture
- Abdomen cleaned and Port site wound dressing applied
- Uterine manipulator removed and Vaginal bleeding ruled out
- Patient position to now changed to Supine position.
| Older Post | Home | Newer Post |
How to Perform and Implement Task Analysis of Laparoscopic and Robotic Procedures
Task analysis is a critical component of any complex surgical procedure, including laparoscopic and robotic surgeries. It involves breaking down the procedure into its constituent tasks, identifying the steps, skills, and cognitive processes required. Task analysis not only enhances the understanding of these intricate surgeries but also serves as a foundation for training, skill assessment, and continuous improvement in healthcare. In this essay, we will delve into how to conduct and implement task analysis for laparoscopic and robotic procedures.
Understanding the Significance of Task Analysis
Before we explore the procedure for task analysis, it's essential to recognize why it is of paramount importance in the realm of surgery, particularly for laparoscopic and robotic procedures.
1. Enhanced Learning and Training: Task analysis helps in developing structured training programs. It breaks down complex procedures into manageable components, making it easier for trainees to learn and practice each step methodically.
2. Skill Assessment: By understanding the tasks and sub-tasks involved, it becomes possible to assess the competence of surgeons and surgical teams. This is crucial for ensuring patient safety and quality care.
3. Workflow Optimization: Task analysis can reveal inefficiencies in surgical workflows. Identifying these bottlenecks allows for process improvements, potentially reducing surgical times and enhancing outcomes.
4. Error Reduction: Recognizing potential points of error is vital for preventing surgical complications. Task analysis can highlight critical steps where errors are more likely to occur, leading to proactive measures to mitigate risks.
Procedure for Task Analysis of Laparoscopic and Robotic Procedures:
Task analysis for laparoscopic and robotic procedures involves several steps:
Step 1: Define the Surgical Procedure
Begin by clearly defining the surgical procedure you wish to analyze. Whether it's a laparoscopic cholecystectomy or a robotic prostatectomy, having a specific procedure in mind is essential.
Step 2: Gather Expert Input
Engage experts in the field, including experienced surgeons, nurses, and other surgical team members. Their input is invaluable in identifying and detailing the tasks involved.
Step 3: Identify the Tasks and Sub-Tasks
Break down the surgical procedure into tasks and sub-tasks. For instance, in a laparoscopic cholecystectomy, tasks could include trocar placement, camera insertion, gallbladder dissection, and suturing. Sub-tasks under "trocar placement" might involve choosing trocar sizes, making incisions, and inserting trocars.
Step 4: Sequence the Tasks
Establish the chronological order of tasks. Determine which tasks are dependent on others and identify any parallel processes. Sequencing tasks is essential for understanding the flow of the procedure.
Step 5: Define Task Goals and Objectives
For each task and sub-task, define the goals and objectives. What should be achieved in each step? For instance, in gallbladder dissection, the goal might be to safely detach the gallbladder from the liver while preserving nearby structures.
Step 6: Skill and Equipment Requirements
Specify the skills and equipment required for each task. Consider the level of expertise needed, such as basic laparoscopic skills or advanced robotic manipulation. Document the instruments and technology involved.
Step 7: Cognitive Processes
Identify the cognitive processes involved, such as decision-making, spatial orientation, and problem-solving. Understanding the mental aspects of surgery is critical for training and error prevention.
Step 8: Consider Variations and Complications
Acknowledge potential variations in the procedure and anticipate complications. How would the surgical team adapt if unexpected issues arise? Task analysis should encompass both the standard procedure and potential deviations.
Step 9: Develop Training and Assessment Tools
Use the task analysis results to create structured training modules. These modules should align with the identified tasks, objectives, and skill requirements. Additionally, design assessment tools to evaluate the competence of trainees and surgical teams.
Step 10: Continuous Improvement
Task analysis is not a one-time endeavor. Regularly revisit the analysis to incorporate new techniques, technology, and best practices. Continuous improvement is vital for staying at the forefront of surgical care.
Implementing Task Analysis Results:
Once task analysis is complete, it's crucial to implement the findings effectively:
1. Training Programs: Develop and deliver training programs based on the task analysis. These programs should encompass both simulation-based training and real-life surgical experience.
2. Skill Assessment: Use the assessment tools developed during task analysis to evaluate the skills of surgical teams. This can be done through structured evaluations and objective metrics.
3. Quality Improvement: Task analysis can reveal areas for process improvement. Work with the surgical team to implement changes that enhance efficiency and patient outcomes.
4. Error Prevention: Utilize the identified points of error to develop strategies for error prevention. This might involve checklists, preoperative briefings, and enhanced communication protocols.
5. Research and Innovation: Task analysis can also guide research efforts, leading to the development of new techniques and technologies that improve surgical procedures.
In conclusion, task analysis is an indispensable tool in understanding, teaching, and advancing complex surgical procedures such as laparoscopic and robotic surgeries. By meticulously dissecting each task and sub-task, identifying skill requirements, and considering cognitive processes, healthcare professionals can enhance patient safety, optimize surgical workflows, and continually improve the quality of surgical care. Task analysis is not merely an analytical exercise; it is a pathway to excellence in surgical practice.