Comparison Between Different Access Techniques for Creating Pneumoperitoneum in Gynaecological Laparoscopic and Robotic Surgeries
Comparison Between Different Access Techniques for Creating Pneumoperitoneum in Gynaecological Lapar
(MBBS, M.S. OBGY)
Comparison Between Different Access Techniques for Creating Pneumoperitoneum in Gynaecological Laparoscopic and Robotic Surgeries
ABSTRACT
BACKGROUND
The main challenge facing the laparoscopic surgery is the primary abdominal access, as it is usually a blind procedure associated with vascular and visceral injuries. Complications associated with laparoscopy are often related to entry. The life-threatening complications include injury to the bowel, bladder, major abdominal vessels, and anterior abdominal-wall vessel. Other less serious complications can also occur, such as post-operative infection, subcutaneous emphysema and extra peritoneal insufflation. There is no clear consensus as to the optimal method of entry into the peritoneal cavity. It has been proved from studies that 50% of laparoscopic major complications occur prior to the commencement of the surgery. The surgeon must have adequate training and experience in laparoscopic robotic surgery before intending to perform any procedure independently. He /she should be familiar with the robotic equipment, instrument and energy source he intends to use.
AIM OF STUDY
Aim of this dissertation is to study the incidence of complications according to different techniques used for inducing pneumoperitoneum in laparoscopic robotic surgery.
MATERIALS AND METHODS
Prospective and retrospective data was collected for (50) patients underwent laparoscopic surgery from September 2015 to September 2016 in World Laproscopy Hospital , all these patients were operated here using different entry techniques.
RESULTS
Three hundred and sixty patients underwent laparoscopic surgery; The operations included in our study were Totla laproscopic hysterectomy (254), diagnostic laparoscopy for infertility and abdominal pathology (56), ovarian cystectomy (20), diagnostic hysteroscopy(15), operative hysterscopy(13), sacrocolpopexy (2).
The early complications recorded in our study are abdominal wall vascular injuries, visceral injuries ,bradycardia , preperitoneal insufflations .The incidence of laparoscopic entry related injuries in gynecological operations was 6.9% .But the incidence of laparoscopic entry related injuries in major pelvic operations was 7.8% .
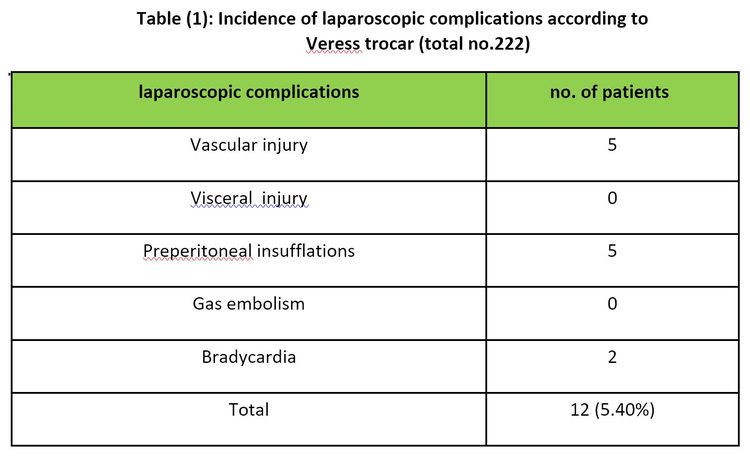
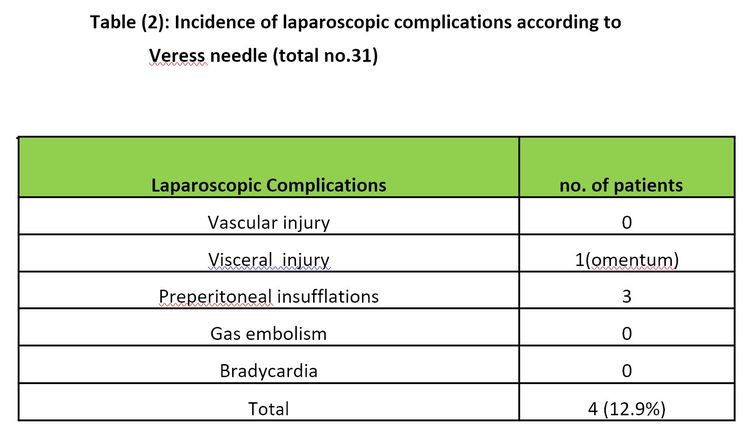
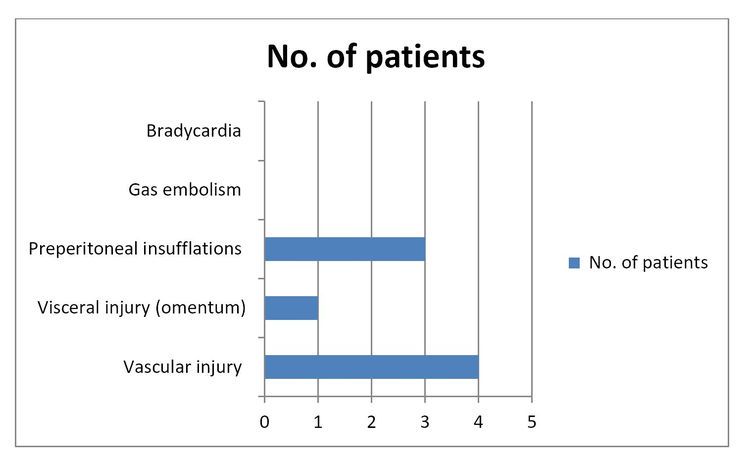
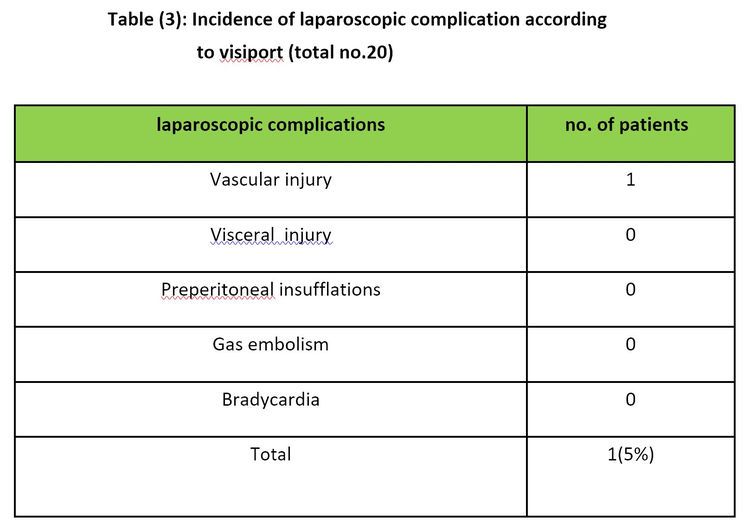
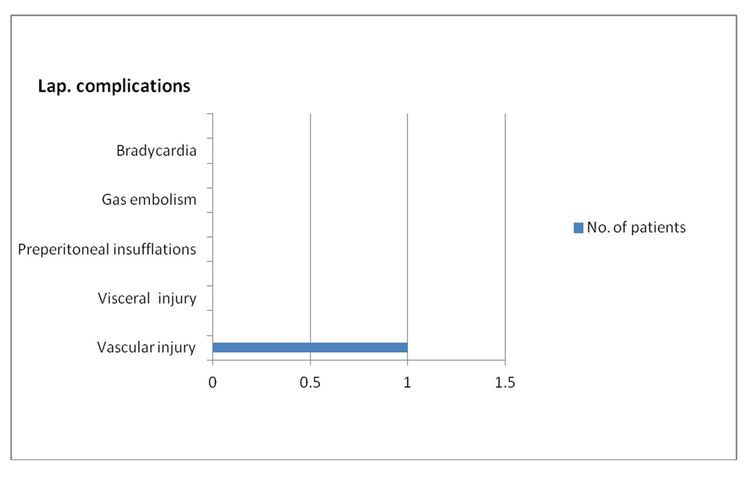
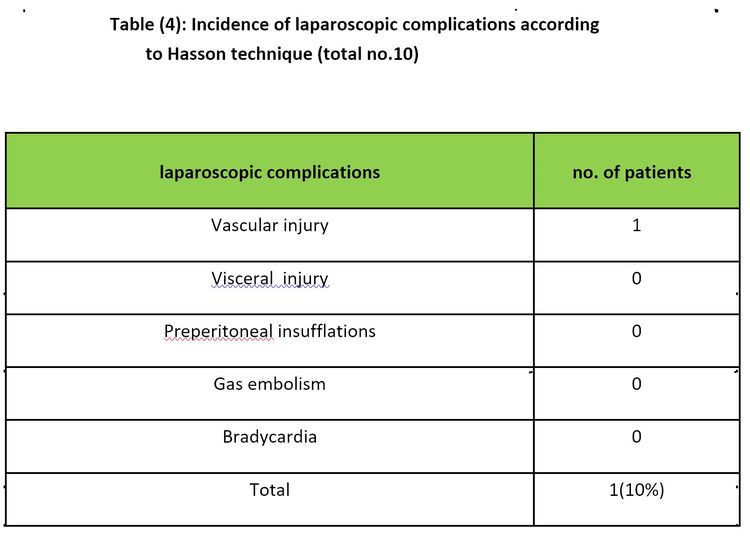
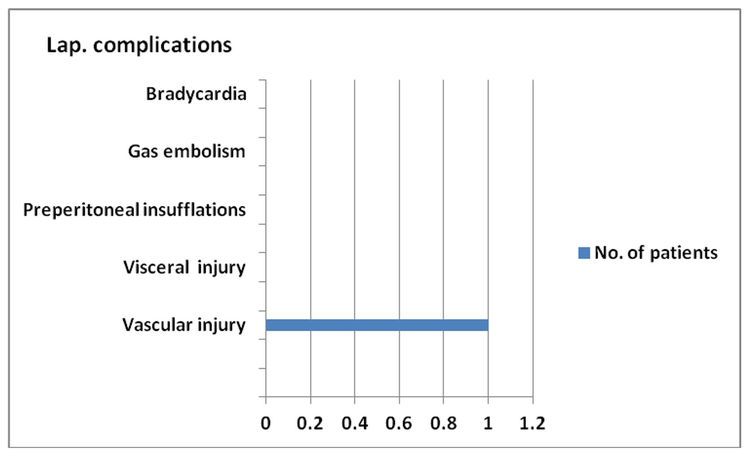
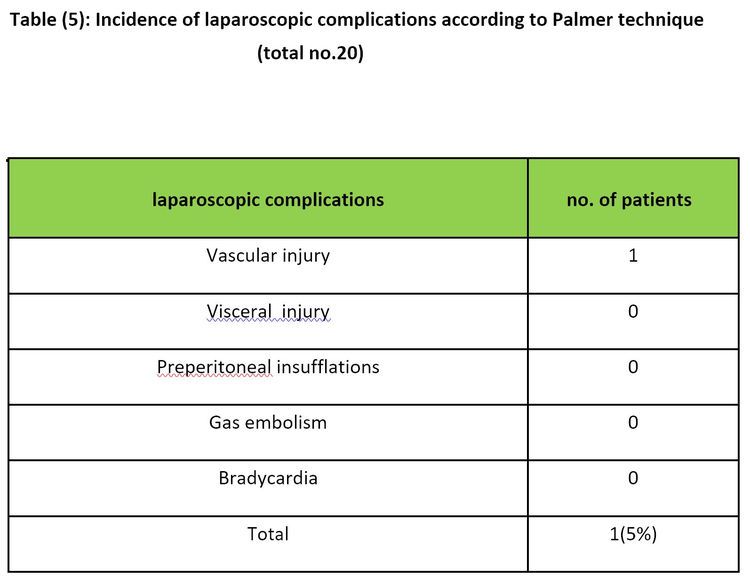
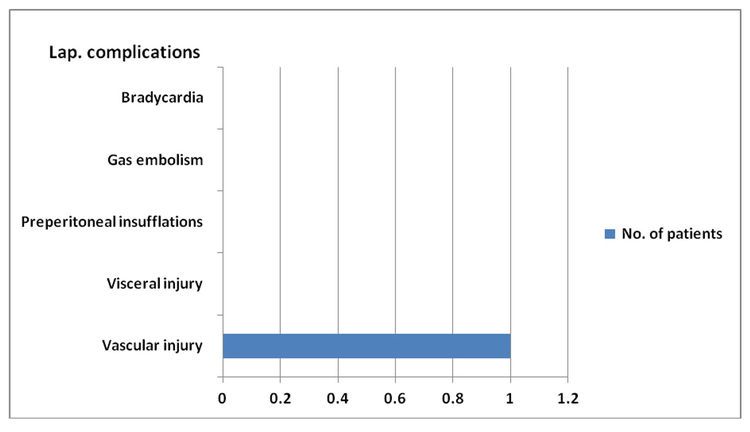
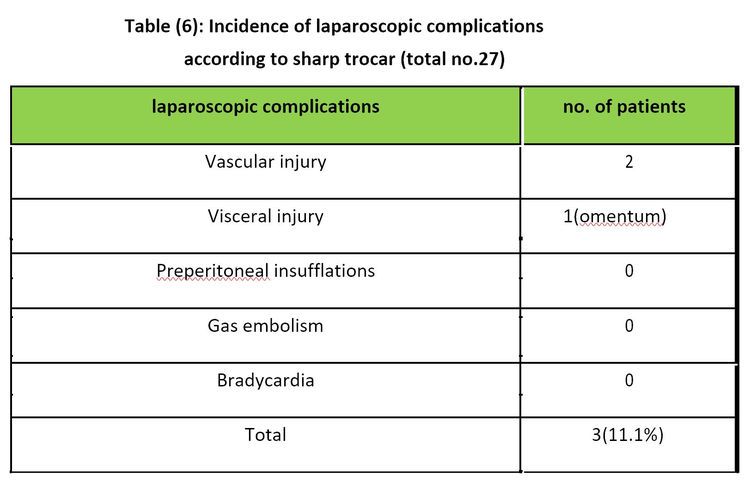
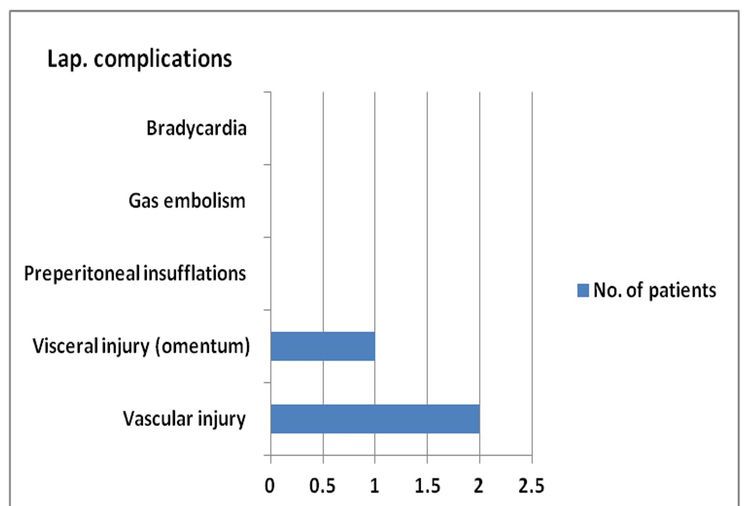
Peritoneal insufflations by Co2 done by different entry techniques as follow; 1-veress trocar: used in (222) patients. 2-veress needle: used in (31) patients. 3-blunt trocar: used in (30) patients. 4-sharp trocar: used in (27) patients. 5-visiport: used in (20) patients. 6-palmer technique: (20) patients; used when the patients have umbilical scar . 7-Hasson technique: used in (10) patients.
CONCLUSION
There appears to be no evidence of benefit in terms of safety of one technique over another. However, the included studies are small and cannot be used to confirm safety of any particular technique. No single technique or instrument has been proved to eliminate laparoscopic entry associated injury. Proper evaluation of the patient, supported by good surgical skills and reasonably good knowledge of the technology of the instruments remain to be the cornerstone for safe access and success in minimal access surgery.
KEYWORDS
Trocar, Laproscopy , Robot,Complications, Pnumoperitoneum
INTRODUCTION
Intuitive Surgical is the leading company in the field of digital surgery with its Da Vinci Surgical System. Approved in July 2000 to perform advanced surgical techniques such as cutting and suturing, this system is the first operative surgical robotic system to be cleared by the FDA.
SYSTEM OVERVIEW
1. Surgeon Console
The surgeon is situated at this console several feet away from the patient operating table. The surgeon has his head tilted forward and his hands inside the system’s master interface. The surgeon sits viewing a magnified three- dimensional image of the surgical field with a real-time progression of the instruments as he operates. The instrument controls enable the surgeon to move within a one cubic foot area of workspace.
2. Patient-side Cart
This component of the system contains the robotic arms that directly contact the patient. It consists of two or three instrument arms and one endoscope arm. The feedback as of today is limited to sensing tool-on-tool collision, so the surgeon needs to rely almost solely on the visual field when suturing or contacting soft tissue. As of 2003, Intuitive launched a fourth arm, costing as a part of a new system installation or as an upgrade to an existing unit .It provides the advantages of being able to manipulate another instrument for complex procedures and removes the need for one operating room nurse
3. Detachable Instruments
The Endowrist detachable instruments allow the robotic arms to maneuver in ways that simulate fine human movements. Each instrument has its own function from suturing to clamping, and is switched from one to the other using quick-release levers on each robotic arm. The device memorizes the position of the robotic arm before the instrument is replaced so that the second one can be reset to the exact same position as the first. The instruments’ abilities to rotate in full circles provide an advantage over non-robotic arms.
The seven degrees of freedom (meaning the number of independent movements the robot can perform) offers considerable choice in rotation and pivoting .Moreover, the surgeon is also able to control the amount of force applied, which varies from a fraction of an ounce to several pounds. The Intuitive Masters technology also has the ability to filter out hand tremors and scale movements. As a result, the surgeon’s large hand movements can be translated into smaller ones by the robotic device.
4. 3-D Vision System
The camera unit or endoscope arm provides enhanced three-dimensional images. This high-resolution real-time magnification showing the inside the patient allows the surgeon to have a considerable advantage over regular surgery. The system provides over a thousand frames of the instrument position per second and filters each image through a video processor that eliminates background noise. The endoscope is programmed to regulate the temperature of the endoscope tip automatically to prevent fogging during the operation. Unlike The Navigator Control, it also enables the surgeon to quickly switch views through the use of a simple foot pedal. To start the procedure, the surgeon’s head must be placed in the viewer. Otherwise, the system will lock and remain motionless until it detects the presence of the surgeon’s head once again. During the procedure, a zero-point movement system prevents the robotic arms from pivoting above or at the one-inch entry incision, which could otherwise be unintentionally torn. Included in the power source is a backup battery that allows the system to run for twenty minutes, giving the hospital enough time to reestablish power. Each instrument contains a chip that prevents the use of any instrument other than those made by Intuitive Surgical. These chips also store information about each instrument for more precise control and keep track of instrument usage to determine when it must be replaced.
DOCKING IN ROBOTIC SURGERY
STEPS OF DOCKING:
1. Position patient and OR table, including table tilt.
2. Position patient cart over patient.
3. Set patient cart brakes.
4. Docking the camera arm.
5. Docking the instrument arms.
6. Check system setup.
The patient table should be positioned according to surgeon preference (depending on the contemplated procedure) before docking the robotic arms. Once the arms are docked to the ports and instruments placed, patient position should not be changed.
The pneumoperitoneum is created and the ports inserted by either the lead surgeon or the patient side assistant surgeon.
PORT PLACEMENT
The port positions vary from patient to patient, procedure to procedure and surgeon to surgeon. It is very difficult to form guidelines specific position of ports but broad guidelines are framed to maximise endoscopic view, instrument reach and to minimise external arm clashing
Camera port is inserted keeping following principles in mind:
a. Should be in line with the target anatomy (TA).
b. Should be at 10-20 cm distance from the TA.
c. Should be in line with the center column of the patient cart.
A diagnostic laparoscopy is done after insertion of the camera port to look for safe entry, any adhesions and surgical feasibility. A disposable 12 mm trocar cannula assembly is used as the camera port. There are specialised camera arm cannula mounts (on the patient cart camera arm) corresponding to each validated third party cannula.
Working Port in Da Vinci Surgery
8 mm da vinci ports are inserted for robotic arms are inserted keeping in mind the following principles:
a. >8 cm distance between the da vinci ports (Fig. 7A).
b. 10-20 cm distance should be maintained between the ports and target anatomy
10 cm distance from target anatomy is good but 20 cm distance is better. Ports placed closed to the target anatomy impedes the view of the surgical site and makes the operation technically challenging.
Conversely, ports placed >20 cm from target anatomy makes it difficult to see or reach with robotic instruments. Assistant port if needed is inserted 5-10 cm away from the da vinci ports in the desirable position. 5 mm or 10 mm ports can be used according to the intended function of the port. Da Vinci provides 8 mm reusable cannulas with disposable seals for the robotic arms. They come with bladeless obturator for insertion.
These come in two lengths:
a.Short (11 cm cannula)
b. Long (16 cm cannula) for high BMI patients.
REMOTE CENTRE TECHNOLOGY
Remote center is the fixed point in the space around which surgical arm and cannula move. It helps in manoeuvring instruments/endoscopes in surgical site while exerting minimal force on the abdominal or thoracic wall. It is marked on the da vinci cannulae at a point to minimise stress to the patient. Remote center can be adjusted on patient side at the patient cart using the clutch button.
POSITIONG THE PATIENT CART
Once the patient is positioned and the ports are inserted, it is time to attach patient cart instrument arms to the patient in a process called docking. Before moving patient cart into position over the patient, it is important to align the table and the patient. Then push the patient cart over the patient using the motor drive on the cart.
DOCKING THE CAMERA ARM
Camera arm should be docked first after positioning the patient cart. Align the camera port, target anatomy and the center column of the patient cart. Use clutch button to change the angle of camera arm to match the angle of cannula so that it points to target anatomy. Stabilise the cannula at the port site with one hand pointing it towards the target anatomy. Bring cannula into the cannula mount on the camera arm and clip both wings shut to hold the cannula in place.
Camera arm setup joint is placed opposite the instrument arm . Setup joints are numbered starting from the joint closest to the center column. Setting the system in this position allows maximum range of motion for all instrument arms. There is a thick blue line and a blue arrow on setup joint on the camera arm indicating the sweet spot. Sweet spot should be aligned by lining up the blue arrow within the boundaries of blue line. Setting sweet spot gives patient cart arms maximum range of motion ensuring instrument and endoscope reach of all parts of target anatomy. Remember that overextending or not extending the camera arm enough will limit the instrument range of motion. Align the camera arm clutch button, 3rd setup joint and the center column. Strive to maintain the sweet spot and alignment of the camera arm throughout the docking process.
DOCKING OF INSTRUMENT ARM
After docking the camera arm, instrument arms are positioned in place so as to allow maximum range of motion of the arms. It is done in following steps: a. Position the instrument arm with the arm number and sterile adaptor facing forwards. Allow approximately 45 degree angle between each arm. Note that the position of instrument arm 3 can vary according to patient body habitus and the procedure. After positioning, ensure that the arms will not collide with the patient or interfere with each other.
Dock the instrument arms by bringing them to the cannula using the port clutch button. Bring the instrument arm to the cannula and lock the wings of the quick click cannula mount on the arm to clip the arm to the cannula. Confirm that the remote center of the port is present at the desired place in the abdominal wall. Remember to stabilise the cannula with one hand at the port site while docking the instrument arm.
CHECKING SYSTEM CHECKUP
After docking the instrument arms, check the arm setup. Start by confirming that the sweet spot of the camera arm is in right position (i.e. arrow is pointing towards the thick blue line). If needed, move the arm back into position taking care to stabilise the cannula at the port site.
Next, check the alignment of the camera port, target anatomy and the center column of the patient cart.
Now check the instrument arm setup. Separate the instrument arms to maximise the range of motion. Check the setup joint angles to minimise potential collisions. The angle at the setup joint 2 should be approximately 90 degree so that depicts the correct method of docking the patient cart.
Endoscope Insertion and Removal First, insert the endoscope into the cannula keeping the intuitive logo on the camera head facing the camera arm. Place the body of the endoscope into the camera arm sterile adaptor making sure that the body of endoscope is fully connected. Give it a gentle turn to ensure it is locked in place.
INTRODUCTION
The word laparoscopy originated from the Greek word (Lapro-abdomen, scopion-to examine). Gaining access to create space for operability with gas or without is the first and foremost step in minimal access surgery.The creation of pneumoperitoneum brings out panoramic view of the entire abdomen in all its glory and clarity with precision.
The introduction of the first trocar, often following creation of the pneumoperitoneum is considered as crucial, and the most dangerous step of a laparoscopic procedure. Throughout the years individual methods of laparoscopic entry were described. The first person to create the pneumoperitoneum was German surgeon Georg Kelling (1866-1945). He performed this procedure on dogs.
Among the methods actually used, arguably the most popular method of the closed laparoscopic entry probably was introduced in 1947 by Raol Palmer (1904-1945) French gynaecologist, who was also the inventor of an insuflator, which was adapted from a colposcopy pressure measuring device. He was followed by Kurt Semm (1927-2003) German gynaecologist, who invented also an automated electronic insuflation device. They both used in this technique the needle formerly developed in 1938 by a Hungarian, Janos Veres1 (1903-1979) which had been primarly used for the creation of a pneumothorax. The last two, but not least to mention are Harrith M. Hasson, an American who described the open access laparoscopy in 1970, arguably considered as the safer than the classic closed (blind) method, and JR Dingfelder, who developed the direct laparoscopic trocar insertion technique in 1978.
Access into the abdomen is the one challenge of laparoscopy that is particular to the insertion of surgical instruments through small incisions. Laparoscopy is currently widely used in the practice of medicine, for both diagnostic and therapeutic purposes.
Laparoscopic procedures are not risk free. Laparoscopic entry is a blind procedure, and it represents a problem for all the related complications. Developing access skill is one of the important achievements for the surgeon practicing minimal access surgery.
It has been proved from studies that 50% of laparoscopic major complications occur prior to the commencement of the surgery (1, 2). The Royal College of Obstetricians and gynaecologists – London, conducted a survey evaluating the laparoscopic surgery complications, the rate of laparoscopic entry related complications was 0.3% (3).In a recent literature review, the risk of primary access complications in advanced laparoscopic tertiary centre was 0.1%. The surgeon must have adequate training and experience in laparoscopic surgery before intending to perform any procedure independently.
Finding a safe entry technique is a priority not only for the life of the patients but also for the increasing rate. In the last three decades, rapid advances in laparoscopic surgery have made it an invaluable part of general surgery, but there remains no clear consensus as an on optimal method of entry into the peritoneal cavity.
There are three type of laproscopic access with many variation and modifications. The veress needle technique is the oldest and more traditional method of laproscopic entery. The direct trocar insertion technique involves direct penetration of the fascia and peritoneum by the trocar. Finally in the open or Hassons technique , a mini laprotomy is performed so that the initial trocar can be placed under direct visualization.
PREPARATION OF PATIENT:
The patient should be nil orally since the morning of surgery. In some of the procedure like LAVH or colorectal surgery where distended bowel may interfere it is good to prepare bowel prior to the night of surgery by giving some mild purgative. Bowel preparation can minimize the need of accessory port to retract the bowel. Before coming to operation theatre patient should always void urine. The full urinary bladder may get perforation at the time of insertion of veress needle or trocar. If the laparoscopic procedure is going to be performed of upper abdomen then Foleys catheterization is not necessary. If gynaecological operative surgery or any general surgical lower abdominal procedure has to be performed (like hernia or adhesiolysis) it is wise to insert Foleys catheter.
If surgeon is going to perform any upper abdominal procedure like Cholecystectomy, Fundoplication, Duodenal perforation, Hiatus hernia etc it is good practice to have nasogastric tube in place. A distended stomach will not allow proper visualization of callots triangle and then surgeon has to apply more traction over fundus or Hartman pouch and this may cause tenting of CBD followed by accidental injury. In gynaecological or lower abdominal laparoscopic procedure it is not necessary to put nasogastric tube.
In minimal access surgery shaving of skin is not must and if necessary it should be done on operation table it self by surgeon.
PATIENT POSITION:
If laparoscopy has to be performed, initially at the time of pneumoperitoneum by veress needle patient should be placed supine with 10-20 degrees head down. The benefit of this steep trendelenburg position is that bowel will be pulled up and there will be more room in pelvic cavity for safe entry of veress needle. It is important to remember that patient should be placed in head down position only if surgeon is planning to insert veress needle pointing towards pelvis cavity. If surgeon is planning to insert veress needle perpendicular to abdominal wall as in case of very obese patient or diagnostic laparoscopy in local anaesthesia the patient should be placed in supine position otherwise all the bowel will come just below the umbilicus and there is increased risk of bowel injury.
In Gynaecological laparoscopic procedures or if laparoscopy is planned to be performed together with hysteroscopy, patient should be positioned in lithotomy position & one assistant should be positioned between the leg of patient. Patients leg should be comfortably supported by padded obstretic leg holders or Allen stirrups which minimizes the risk of venous thrombosis. In these procedure surgeon need to use uterine manipulator for proper visualization of female reproductive organs. The assistant seating between the leg of patient will keep on watching the hand movement of surgeon on monitor and he should give traction with the handle of uterine monitor in appropriate direction. If thoracoscopy or retroperitoneoscopy is planned then patient is placed in lateral position.
POSITION OF SURGICAL TEAM
The laparoscopic surgeon is very much dependent & helpless with eye fixed on monitor. At the time of laparoscopic surgery surgeon is largely depending on the skill of his assistant. If the surgery is of upper abdomen french surgeon likes to stand between the legs of patient, popularly known as “French position”. The American surgeons like to operate from left in cases of upper abdominal surgery like Fundoplication & hiatus hernia called as “American position”.
Laparoscopic surgery is not in its infancy stage now. It is not wise to remain stand in any one position & surgeon should walk. In most of the cases at the time of access surgeon should stand on left side of the patient, if surgeon is left handed he should stand right to the patient at the time of access. This helps in inserting veress needle & trocar towards pelvis by dominant hand. Once all the ports are in position then surgeon should come opposite to the side of pathology to start doing surgery. In cholecystectomy, appendectomy, right sided hernia or right ovarian cyst surgeon should stand left to the patient. In left sided pathology like left ovarian cyst and left sided hernia it is ergonomically better for surgeon to stand right to the patient. In most of the upper abdominal surgery camera assistant should stand left to the surgeon & in lower abdominal surgery he or she should stand right to the surgeon. Camera assistant while holding telescope can pass his or her hand between body and arm of surgeon so that some time surgeon can help him to focus his camera correctly. Camera assistant can be placed opposite to the surgeon to stand but in this case it is better to have two monitor on both the side of patient, one for surgeon and one for camera stand and other members of surgical team.
CHOICE OF GAS FOR PNEUMOPERITONEUM
The ideal gas for for insufflation during laparoscopy must have following characters:
Limited systemic absorption across the peritoneum
Limited systemic effects when absorbed
Rapid excretion if absorbed
Incapable of supporting combustion
High solubility in blood
Limited physiological effect with intravascular systemic embolism
First Pneumoperitoneum was created by filtered room air. Carbon dioxide & N2O are now preferred gas because of increased risk of air embolism with room air. CO2 is use for insufflation as it is 200 times more diffusible than 02, is rapidly cleared from the body by the lungs and will not support combustion. N2O is only 68% as rapidly absorbed in blood as CO2. N2O has one advantage over CO2 that it has mild analgesic effect, and so causing no pain if diagnostic laparoscopy is performed under local anaesthesia. For short operative procedures like sterilization or drilling, under local anaesthetic N20 may also be used. During prolonged laparoscopic procedure N2O should not be a preferred gas for pneumoperitoneum because it supports combustion better than air.
CO2 when come in contact with peritoneal fluid converts into carbonic acid. Carbonic acid irritates diaphragm causing shoulder tip pain & discomfort in abdomen. Carbonic acid has one advantage also that it alters pH of peritoneal fluid (acidotic changes) and it is mild antiseptic so the chances of infection may be slightly less compared to any other gas. Helium gas being inert in nature is also tried in many centers but it does not have any added benefit over CO2.
SITE OF VERESS NEEDLE ENTRY
There are many sites of veress needle entry tried for veress needle insertion but central location of umbilicus and ability of umbilicus to hide scar makes it most attractive site for primary port.
Umbilicus is good site for access because it is:
• thinnest abdominal wall (easy access)
• cosmetically better
• no significant blood vessels
• Ergonomically better (centre point of abdomen)
Initially there was controversy regarding use of umbilicus for first port access. There were two fear regarding use of umbilicus
First concern was regarding infection. Umbilicus is a naturally dirty area and many surgeons were having this impression that it may cause infection of port site. The umbilical skin can not be cleaned of all bacteria even with modern iodophor solution. Carson and associates (1997) demonstrated that the bacteria introduced inside the abdominal cavity through this dirty skin but these bacteria do not have many dead cells to act as culture medium to grow and the normal defence mechanism of body destroys these bacteria rapidly. Second fear of using umbilicus was ventral hernia. Umbilicus is the weakest abdominal wall so the chances are more that ventral hernia may develop if umbilicus is used for access.
A survey of American Association of Gynecological Laparoscopists members reported in 1994 (Montz et al ). The study was of 3127 surgeons and there were 840 hernia reported. 86% of cases of incisional hernia after laparoscopy were due to unrepaired 10 mm or larger port wound.
Due to these two possible complications of using umbilicus for access, many surgeons started using supra-umbilical or infra-umbilical region of abdominal wall for access. Even the port wound of 10 mm away from the umbilical site was also reported higher incidence of incisional hernia. Recent study has proved that umbilicus does not have increased incidence of infection or ventral hernia compared to other site if few precautions are taken.
1. Umbilicus should be cleaned meticulously before incision
2. Rectus sheath of all the 10 mm port should be repaired.
3. If umbilical route is used for tissue retrieval, infected tissue should be removed after putting in endobag. It should not contaminate the port wound.
4. Any haematoma formation at the port wound site should be discouraged by maintaining proper haemostasis
WHERE IN UMBILICUS?
– Superior or inferior crease of umbilicus, in non obese patients ( for abdominal procedure)
– Trans-umbilical, in obese patients or if diagnostic laparoscopy is going to be performed under local anesthesia.
In most of the patient inferior crease of umbilicus is best site of incision. This is called as smiling incision. In obese patient trans-umbilical incision is preferred because this area has minimum thickness of fat. In obese patient veress needle should be inserted perpendicular to the abdominal wall because if oblique entry is tried the full length of veress needle will be some where within the fat pad and there is chance of creation of pre-peritoneal space.
STABILIZATION OF UMBILICUS AND INCISION
Before giving incision along the inferior crease of umbilicus it should be stabilize with the help of two ellis forcep. Once ellis forcep will catch the umbilicus the crease of umbilicus will be everted and it is easy to give smiling incision. Initial 1mm incision with blade no.11 should be given. Some surgeon give 11mm incision in beginning itself but this is not good because gas may leak from the side of puncture of veress needle due to tear in rectus and this will interfere with the quadro-manometric indicator of insufflator. Initial stab wound should be given just skin deep and any puncture of rectus or peritoneum should be avoided.
DIFFERENT METHODS OF ACCESS
In minimal access surgery technique of first entry inside the human body with telescope and instruments is called access technique. Technique of access is different for different minimal access surgical procedures. For thoracoscopy, retroperitoneoscopy, axilloscopy all have completely different way of access.
First entry or access in laparoscopy is of two types
1. Closed access
In closed access technique pneumoperitoneum is created by Veress needle. This is a blind technique and most commonly practiced way of access by surgeons and gynaecologists worldwide. Closed technique of access merely by veress needle insertion and creation of pneumoperitoneum is a easy way of access but it is not possible in some of the minimal access surgical procedures like axilloscopy, retroperitoneoscopy and totally extra-peritoneal approach of hernia repair. In general closed technique by veress needle is possible only if there is a pre-formed cavity like abdomen.
2. Open access
Direct entry by open technique, without creating pneumoperitoneum and insufflator is connected once blunt trocar is inside the abdominal cavity under direct vision. There are various way of open access like Hassons technique, Scandinavian technique, Fielding technique.
Some surgeon and gynaecologists practices blind trocar insertion without pneumoperitoneum. The incidence of injury due to this type of Access is much higher. This type of direct trocar entry is practiced by gynaecologists for sterilization. Sterilization may be performed because in multipara patients the lower abdominal wall is lax; making the fascia thinner and easy elevation by hand is possible. Bleeding due to accidental damage to a major vessel during this initial stage is one of the most dangerous complications of laparoscopic surgery.
TECHNIQUE:
Whilst the patient is in the supine position, a high frequency ultrasound probe is placed transverse to the abdominal wall between the costal margin and iliac crest. The image produced shows (from above downwards) skin, subcutaneous tissue, fat, external oblique, internal oblique, transversus abdominis. The peritoneum and bowel loops may also be visualized deeper to the muscles. The needle is introduced in plane of the ultrasound probe directly under the probe and advanced until it reaches the plane between the internal oblique and transversus abdominis muscles. The needle can also be introduced a few centimeters medial to the probe (a distance equivalent to the depth of the plane as viewed on the ultrasound image). The probe will have to follow the needle entry point medially in its superficial path and is then returned to its original position in the midaxillary line as the needle is directed deeper. Upon reaching the plane, 2 ml of saline is injected to confirm correct needle position after which 20 ml of local anaesthetic solution is injected. The transversus abdominis plane is visualized expanding with the injection ( appears as a hypoechoic space).
COMPLICATIONS
There have been no reported complications to date with the ultrasound guided technique. A few complications have been reported with blind TAP block, the most significant of which was a case report of intrahepatic injection (20). Other complications include: intraperitoneal injection, bowel hematoma and transient femoral nerve palsy. Local anaesthetic toxicity could also occur due to the large volumes required to perform this block especially if it was done bilaterally. As with any regional technique, careful aspiration will help avoid intravascular injections.
MATERIAL AND METHODS
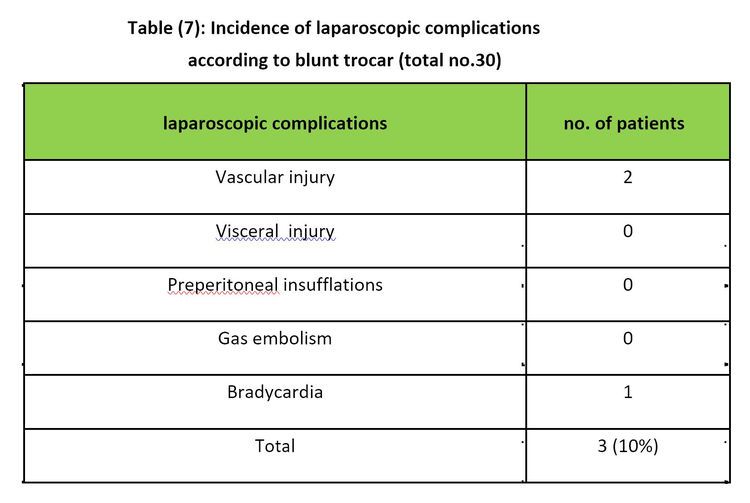
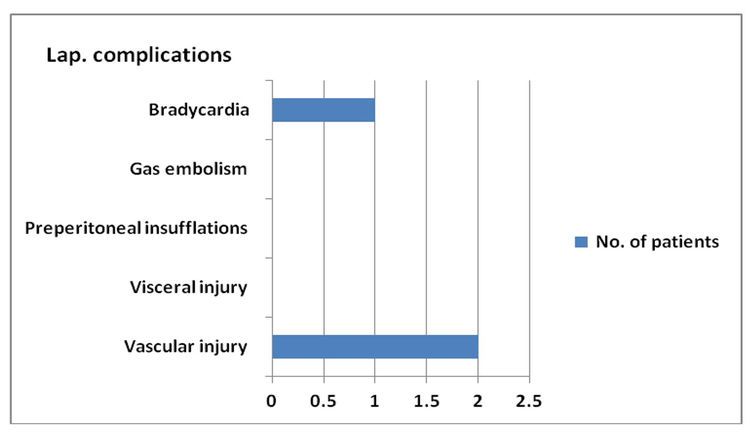
Prospective and retrospective (2015-2016) data was collected for (360) patients underwent laparoscopic surgery from October 2015 to september 2016 in Max Super Speciality Hospital, Saket, New Delhi all these patients were operated by surgeons using different entry techniques. The operations included in our study were Robotic Surgery, Total Laparoscopic Hysterectomy, diagnostic laparoscopy for infertility and abdominal pathology, ovarian cystectomy and Sacrocolpoplexy, Diagnostic Hysteroscopy and Operative Hysteroscopy. The complications resulting from entry techniques were identified intraoperatively or inquired from operating surgeons postoperatively. The techniques included in this study were: 1-Verres trocar 2-verres needle 3-blunt trocar 4-sharp trocar 5-Hasson technique 6-palmer technique 7-visiport. The complications searched in this study were: 1-vascular injury 2-visceral injury 3-preperitoneal insufflations 4-gas embolism 5-. bradycardia. The distension pressure was between 10 – 12 mmHg in all our laparoscopic surgery.
RESULTS:
Three hundred and sixty patients underwent laparoscopic surgery: The operations included in our study were Totla laproscopic hysterectomy (254), diagnostic laparoscopy for infertility and abdominal pathology (56), ovarian cystectomy (20), diagnostic hysteroscopy(15), operative hysterscopy(13), sacrocolpopexy (2). The early complications recorded in our study are abdominal wall vascular injuries visceral injuries ,bradycardia , preperitoneal insufflations .The incidence of laproscopic entry related injuries in gynecological operations was 6.9% .But the incidence of laproscopic entry related injuries in major pelvic operations was 7.8%. Peritoneal insufflations by Co2 done by different entry techniques as follow; 1-veress trocar: used in (222) patients. 2-veress needle: used in (31) patients. 3-blunt trocar: used in (30) patients. 4-sharp trocar: used in (27) patients. 5-visiport: used in (20) patients. 6-palmer technique: (20) patients; used when the patients have umbilical scar . 7-Hasson technique: used in (10) patients.

DISCUSSION:
In our study the entry related complications in gynecological operations are 6.9%. The result of a prospective observational study of all gynecological laparoscopic procedures in United Kingdom performed by all grade of staff in a teaching hospital over a period of twelve months showed an incidence of 0.3% laparoscopic entry related injuries (187). The overall incidence of laparoscopic entry injuries in the Dutch study was 0.33%. There were 29 cases of gastro-intestinal damage. (0.13%). 27 cases of abdominal vessels injuries (0.1%)(188). In our study we report no such complications whatever the technique used. A prospective study of 1265 cases underwent major pelvic surgery performed in advanced surgery centre in Australia; the overall incidence of complications was 0.6%. Fifty percent of complications were related to laparoscopic entry (189) , while in our results the incidence of entry related complication was 7.8% (10 patients out of 78).In the united states a review of 51 publications including 21547 open technique,16739 direct entry technique and 134917 Veress/ trocar reported entry related bowel injury were 0.11% (open), 0.05% (direct entry) and 0.04% (Veress/trocar) (190). While in our study of 360 cases underwent laparoscopic surgery, the incidence of complications were (11.1% , 10% , 12.9% , 5.4%, 5%, 10% & 5% ) to corresponding entry techniques (sharp trocar, blunt trocar, Veress needle, Veress trocar, palmer technique, Hasson technique & visiport) respectively. Chamberlain GVP, Brown JC (188) after 70607 laparoscopic procedures performed, 256 complications were reported to the national patient insurance association. The overall rate of major complications was 0.14%. This includes 0.06% intestinal injury, 0.03%urological injuries and 0.01% vascular injuries[188], while in our study there were no such major complications. By Hakki-Siren, Kurki T. a multicentre prospective study from 72 hospitals, the overall incidence of cases of intestinal injuries of major complications was 0.57%. Seventy percent of these were related to the primary port entry(192), but in our study we reported no such complications.Hasson reviewed 19 publications in which closed entry technique was used by surgeons and gynecologists. The total number of laparoscopic operations performed was 660110. These were compared with 17 publications where the open technique was used. The total number of operations performed was 579510. The incidences of complications in the open laparoscopy group were as follows: umbilical infection 0.4%, bowel injury 0.1%, and vascular injury 0.0%. The corresponding complications rates for closed laparoscopy were 0.2%, 0.1% and 0.2% respectively (193). While in our study, 10% complications (vascular injury) occurred in open (Hasson technique).A meta-analysis of 760890 closed laparoscopy and 22465 open laparoscopy reported the incidence of vascular injury rate in closed.
Comparison between different entry techniques in performing pneumoperitoneum in laparoscopic surgery was 0.44% compared with 0% in open laparoscopy. The incidence of bowel injury 0.7% compared with 0.5% respectively. The authors concluded that the open (Hasson) technique eliminate the risk of vascular injury and gas embolism and reduces the risk of bowel injury and recommend the open technique to be adopted for primary laparoscopic entry(189). While in our study, no complications (bowel injury) occurred in open (Hasson technique). From the results above, it is evident that our incidence of complications more than in other studies and this can be attributed to the inclusion of vascular injury in the abdominal wall in our study, and this by mean has no relation to a technique of entry because for all different modality of entry the blade will incise the wound, otherwise incidence of complications is less or similar to studies abroad.
CONCLUSION:
Laparoscopic techniques have revolutionized the field of surgery. Before any laparoscopic procedure can begin, the peritoneal cavity needs to be accessed to establish pneumoperitoneum and place ports for the laparoscope and various laparoscopic instruments. Initial laparoscopic access can be performed with open (ie, Hasson), or closed (eg, Veress needle) techniques. The Hasson technique refers to an open method in which an incision is made through the abdominal wall and a blunt trocar/port (ie, Hasson cannula) is placed under direct vision. The Veress needle technique is a closed method in which a Veress needle is used to puncture through the abdominal wall. Once the needle is in place, the abdomen is insufflated. The needle is subsequently removed, and a trocar/port is placed through the Veress needle tract.
Initial access for abdominal insufflation is typically performed at the umbilicus. Open access techniques can be performed anywhere on the abdominal wall. Alternative sites for Veress needle insufflation include the ninth left intercostal space, the lateral border of the rectus muscle 3 cm below the left costal margin ( Palmer's point), and the lateral border of the rectus muscle at the level of the iliac crest. The locations for multiple ports in laparoscopic surgery are chosen to triangulate the camera and instruments around a focal point within the abdomen, thereby maintaining optimal access for manipulation of the instruments and providing comfortable positions for the surgeon and assistant.
Advanced approaches under investigation as alternative access techniques for laparoscopic surgery include single incision surgery (SIS) and natural orifice transluminal endoscopic surgery (NOTES). For initial peritoneal access, we suggest that surgeons should adhere to the technique with which they have the most experience . Overall complication rates for laparoscopic access are not significantly different between the Hasson and Veress needle techniques for abdominal insufflation when performed by experienced surgeons; however, the surgeon should be familiar with alternative techniques. Conditions that may require an alternative approach for laparoscopic access include the presence of umbilical hernia, prior abdominal surgery, obesity and pregnancy. We suggest not using blind trocar techniques for peritoneal access, wherever possible, but particularly prior to insufflation of the abdomen. Blind trocar entry is associated with a greater risk of severe complications, including vascular and gastrointestinal injury. Strict adherence to proper technique minimizes the risk of injury with Veress needle insufflation and visual entry devices are readily available for the placement of primary trocars. Secondary trocars should always be placed under direct laparoscopic vision. The negligible benefit of a quicker entry does not justify the risk of a potentially lethal complication. Access-related issues including failed entry, extraperitoneal insufflation, leaking or bleeding ports, and loss of port position or pneumoperitoneum are unique to laparoscopic surgery. Troubleshooting these issues should be approached in a systematic manner to minimize the loss of time and prevent the development of other complications.
No single technique or instrument has been proved to eliminate laparoscopic entry associated injury. Proper evaluation of the patient, supported by good surgical skills and reasonably good knowledge of the technology of the instruments remain to be the cornerstone for safe access and success in minimal access surgery. There appears to be no evidence of benefit in terms of safety of one technique over another. However, the included studies are small and cannot be used to confirm safety of any particular technique. No single technique or instrument has been proved to eliminate laparoscopic entry associated injury. Proper evaluation of the patient, supported by good surgical skills and reasonably good knowledge of the technology of the instruments remain to be the cornerstone for safe access and success in minimal access surgery.